Including bitmap logos on silkscreen
We advise generating logos with a dots per inch (DPI) of less than 400 and a corresponding pixel height of 2.5 mil to be sure the logo will be included and printed correctly.
Background
Eagle’s “import-bmp.ulp” script and other bitmap converters often render a logo as a very high-DPI image, consisting of thousands of tiny pixels. In many cases, the image is around 10,000 DPI, corresponding to pixels smaller than one mil in height.
Our process is not properly equipped to handle features of that size, so we cannot guarantee that they’ll be printed correctly on the final board. The maximum DPI we can correctly process is 500 DPI, corresponding to pixels of 2 mil or larger. Images at a higher DPI may be be printed on the board incorrectly, or omitted entirely. Due to the complexities of bitmaps through fabrication, we advise keeping images to a DPI of under 400 and a corresponding pixel height of 2.5 mil.
If the imported bitmaps fails to appear on the website, or no silkscreen appears at all, then look below for possible resolutions. If you’ve verified that your board is under 500 DPI (preferably under 400), then try uploading the gerber files. Eagle can be very slow to render complex images, which results in our server giving up on that layer.
Note for other design tools
While this guide is geared toward Eagle, the general principles apply equally to any other bitmap converters. In some cases, the design tool may not be particularly helpful in detecting these errors. In those cases, we suggest using GerbV to examine the gerber files for possible line width and polygon height issues.
Detecting problems inside Eagle
After importing an image, you’ll want to select the Move tool, then right click on one of the imported objects, and select the Properties option.
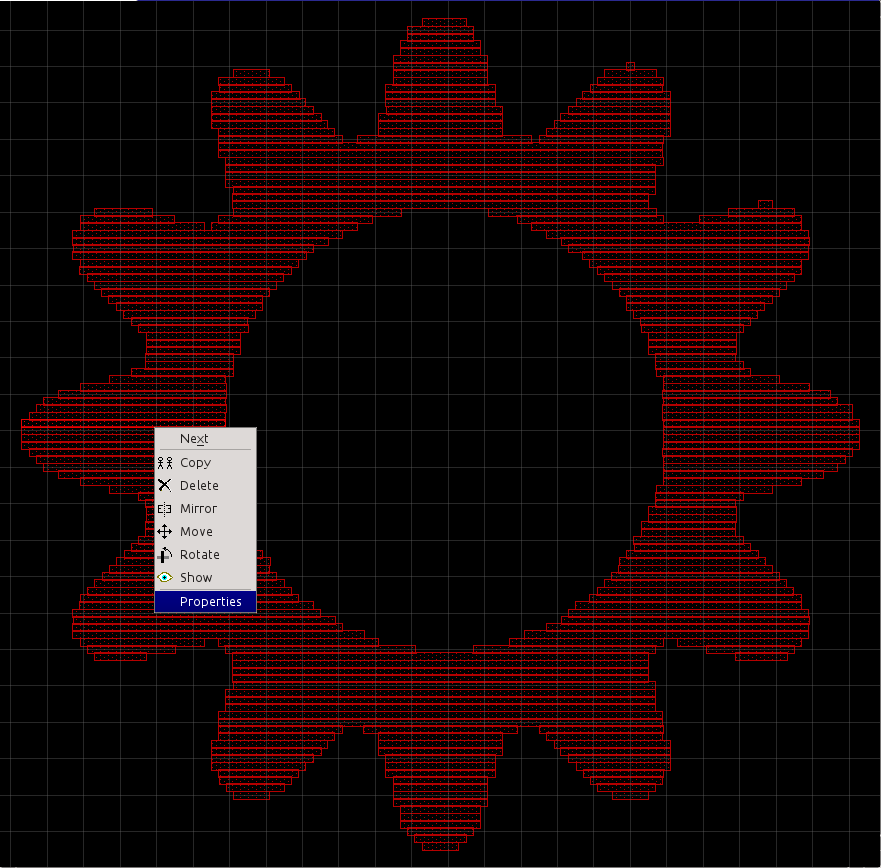
Inside the Properties window, you’ll see the Height. Since the fab can operate at up to 500 DPI, the corresponding Height property would be 2 mil or larger. If you have a Height of less than 2 mil, then the imported image may not work correctly.

Correcting the issue inside Eagle:
There are several methods of correcting the issue inside Eagle, and the ideal method depends on the complexity of the image, the source format, and the importance of the image being printed correctly.
Option 1: Ignore the issue, and submit the gerbers.
If the image is non-critical, or the other methods seem too complicated, this is usually an acceptable solution. While we cannot guarantee high-DPI bitmaps will be printed correctly, the fabs usually will print them correctly. However, if you’re unlucky, then the image might be partially printed, or omitted entirely.
For this option, it’s advised to generate your own gerbers instead of submitting the BRD file. Eagle can be very slow to render imported bitmaps, and our server may time out and result in an error message or a missing layer.
Option 2: Trace the image using the built in tools.
This is the option suggested by Eagle when you first run the Import Bitmap script, and is typically easy to do on simplistic images and text.
Using the Wire, and Polygon tools, trace the image using the imported layers as a reference. Note, that due to how Eagle generates Polygons, you’ll want to set the Width property of any Polygons to 2 or 3 mils. If the Width property is lower than 2 mil, then Eagle will produce the same problematic gerbers that you’re trying to avoid.
For reference, the following text contains the suggestions from the import-BMP script.
This ULP generates a SCRIPT file that draws rectangles of successional pixels with identical color.
These rectangles serve as templates in order to draw the image with EAGLE commands like POLYGON, WIRE, CIRCLE, TEXT.
Please note: If the generated rectangles are smaller than the half of the resolution of the output device, (depending on the scale factor: screen: pixel, printer: diameter of the laser beam or ink jet dropplet), it is not possible to display the result. Therefore use the EAGLE commands mentioned above to reduce the number of elements (rectangles). Each element has to be drawn and calculated by the display device driver. The more elements the slower the display will be.
The ULP accepts BitMaP files with a maximum of 256 colors. You are allowed to select a maximum of 32 of them. [Scan used colors] detects the used number of colors in the image. You have to reduce them to a maximum of 32 in the following dialog.
In the final dialog you can scale the image. Either in Dots per Inch (DPI), Pixel in the units Inch, Mil, Millimeter, Micron, or as Aspect Ratio (the width of the image in pixels in X) in Inch, Mil, Millimeter, Micron. In the case of Aspect ratio, please keep in mind that there should not be pixels in a non-selected color on the left or right boarder of the image. Otherwise the resulting width of the image is not the same as the calculated one.
The start layer for the template is set to 200. Each of the maximum of 32 selected colors will use a separate layer, beginning with the start layer. So it is possible to have colored logos in the Schematic or Symbol Editor.
Reduce the number of colors of an image to two (black/white), if the logo shall be displayed monochrome in one of the copper layers. As soon as the image (logo) is drawn with the EAGLE commands (see above) you may delete the template with GROUP DELETE and a right mouse click. The layers can be removed with LAYER -number afterwards.
Option 3: Resize the image and re-import it.
Using an image processing tool, you can reduce the size of the source image to generate larger pixels inside Eagle. This option is best suited for complicated graphics that must be on the board at a particular size (such as a 1” logo). Rescaling the image allows you to keep the same physical size, while increasing the size of the pixels Eagle generates.
This option often involves a bit of trial and error, so it’s highly advised to back up the file before trying a lot of imports.
Option 4: Import the image as an SVG.
This is a good option for graphics artists working from a vector source image, and can produce incredible results with few headaches. However, it’s much more complicated than the other methods if the source image is a bitmap image such as a PNG, GIF, or JPG.
This requires a third party script. There are several such scripts available online, such as svg2poly. These can be installed and used by placing them in Eagles ULP folder, and accessed by going to File > Run ULP > Eagle2svg.ulp.
When using this option, it’s important to note that the Width property of all polygons must be set to 2 mil or larger, due to how Eagle processes polygons.
